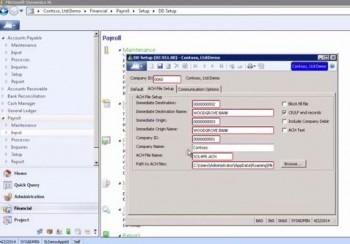
Start by clicking Direct Deposit Setup under the Setup heading, opening the Direct Deposit Setup screen. Under the Default tab, there are settings that will be automatically applied when you set up a direct depositor. The defaults can be overwritten, but they are here to make data input more efficient. The Distribution Type Default is for a person with multiple accounts receiving deposits. You can set up a fixed amount or a percentage that goes to a secondary account, with the rest going to the primary account. Low Pay Rule Default goes into effect when there is not enough money to follow the Distribution Type Default settings. You can choose which account to fund first.
On the ACH File Setup tab, the first five fields are the bank requirements. Fill in the Company Name and ACH File Name fields. The ACH file name can be whatever you want it to be. Then you may want to locate the path to the confidential ACH file to a folder that has limited access by other users. Of the checkboxes on the right, the first three are also bank requirements. If the other checkbox, ACH Test, is selected, you can create and send an ACH file that will contain the first five employees with the numbers of all values set to 9s. This file is sent to the bank to test the file and communication functionality. Of course, you will want to first notify the bank that this is a test file.
The Communication Options tab points to software that will open the audit report that displays after advice slips are printed, but before an ACH file is sent. Typically this is set to the location of notepad.exe, or to something that can read the audit report, so the numbers can be verified before an ACH file is sent.


