In our last couple of entries, we’ve been looking at the Accounts Payable setup options in Microsoft Dynamics SL that provide so much flexibility for your unique way of doing business. We’ve covered the main setup of the Accounts Payable module and the Vendor tab setup options found in the Vendor Maintenance screen. Today we’ll look at some of the other tabs found there.
More About Vendor Maintenance in the Accounts Payable Module
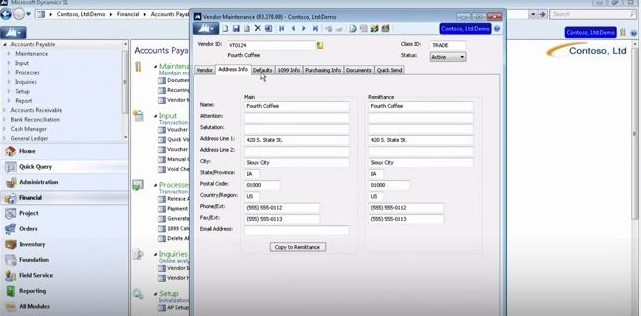
The Address Info tab is where you set up address information for a vendor, as you might expect. You’ll see two columns for all of the information here, “Main” and “Remittance.” You can copy all of the information from the Main column to the Remittance column by simply clicking the Copy to Remittance button at the bottom of the screen. The Remittance information is what the system will use to actually cut a check to that vendor.
The Defaults tab is where you set up tax information for a vendor, and you can set up multiple Tax IDs. Tax IDs can be set up with the Tax Maintenance screen, after which you can use a lookup list to select them on the Defaults tab of the Vendor Maintenance screen. On the right hand side, you can set up accounts and subaccounts. Information may be automatically filled in to these fields depending on the Class ID for the vendor, but you can change any of those default values.
The 1099 Info tab is, of course, for 1099 information. Select whether or not this is a 1099 vendor, and whether or not to calculate backup withholding. At the bottom of the screen you can view the tax totals for the current and next 1099 year. The Purchasing Info tab works with the Purchasing module of Microsoft Dynamics SL. You can view all documents for the vendor on the Documents tab.


