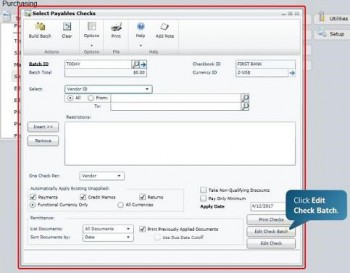
Microsoft Dynamics GP simplifies the process of selecting the vendors and invoices you want to pay with each batch of checks. When you start a new batch of checks, you simply click the Edit Check Batch button. The Edit Payables Check Batch window opens, with a list of vendors on the left. Select a vendor you want to pay here. You can then select or deselect invoices for that vendor from a list on the right. Select another vendor, and you will get a new list of that vendor’s invoices to select or deselect on the right.
You can add a notation by clicking the Edit Check button at the bottom of the window. If you do, the Edit Payables Checks window opens, where you can put a comment in the Comment field, as well as edit any number of fields related to the check. If you click the Check Stub button at the bottom of this window, you can see a list of invoices that will be paid with this check. If you’re happy with what you see, click the OK button at the top, and to save any comment you’ve made, click the Save button at the top of the Edit Payables Checks window.
If you’re happy with your check batch, click the Print Checks button at the bottom of the Edit Payables Check Batch window, then click the Print Checks button at the top of the next window. To post the batch, click the Process button at the bottom of the Post Payables Checks window.


