In our last few entries, we’ve looked at the setup options for the Accounts Payable module for Microsoft Dynamics SL, options that provide so much flexibility for your unique way of doing business. Once you’ve set up the module, and set up the vendors you’ll be working with, you can start actually doing that work. So today we’ll look at what it’s like to use the Accounts Payable tools for Microsoft Dynamics SL.
How to Use the Accounts Payable Module
The general process flow for Accounts Payable is as follows:
- Enter vendor vouchers
- Select vouchers for payment
- Print checks
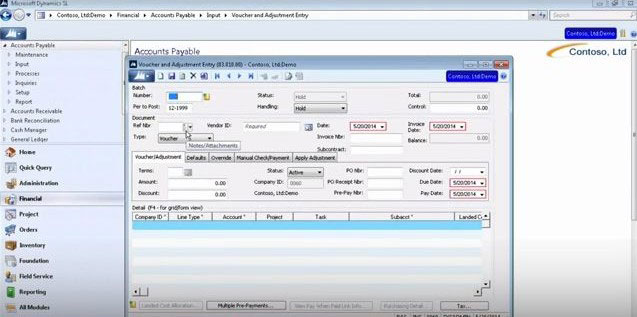
To create an entry in Accounts Payable, you can make a selection from the options under the Input heading. The first and generally the most commonly used option is Voucher and Adjustment Entry. When you click it, your payment process has begun. Much of the information at the top of the Voucher and Adjustment Entry screen, such as the Batch Number and Period to Pay, will be automatically filled in with default values, but you can change these if needed. In the Handling field, you select whether you want to post the batch when you are done or not.
Below that area, the Document Reference Number field may also be automatically populated, but again, you can edit that field if needed. In the Type field you select whether this is a payment or adjustment (debit or credit). Select the vendor with the Vendor ID field. You can use a lookup list for this.
Below that area are five tabs. The first is Voucher/Adjustment, where you select the terms, and where you can view information such as the company you are logged into and any discount for that vendor. Generally this is all you need to make a payment, but the other tabs provide other options for more complex situations.


